Creating & Importing Assets
Learn how to Create and Import custom Assets into nanos world
Before proceeding, please make you followed the first steps and installed Unreal Engine and downloaded the Assets Development Kit project.
It is also recommended to have read the Assets Guide to understand some concepts which will be mentioned here.
Getting Started
The first step to start creating your own Assets is opening the ADK project. Once you do that, you will notice we have two folders in the root Content/ directory: NanosWorld/ and MyAssetPack/:
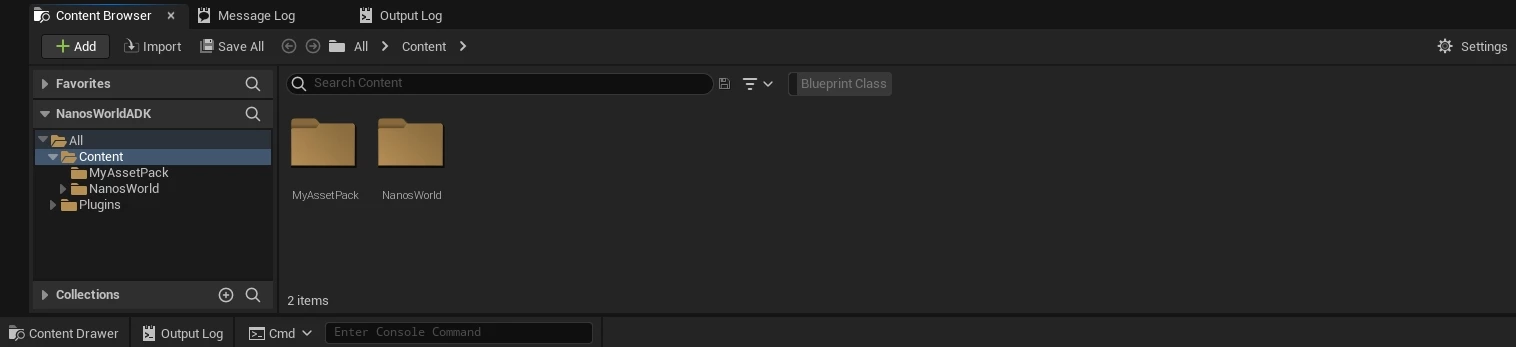
As stated before, do not modify any file inside NanosWorld/ as any change will not be exported neither imported into nanos world.
Game or Plugin Content
Asset Packs can be created from both Game Content or Plugin Content.
Using the Game Content means you will create your assets directly in your Unreal Project Content/ folder, this is the most straightforward way of creating assets.
Alternatively, you can create Content Plugins to have a better organization and separation of your assets.
It's up to you to decide whether you want to use Game Content or Plugin Content. If you are unsure, start creating your assets using Game Content:
Option A: Using Game Content
For Game Content, any folder you create inside the Content/ folder can be cooked and mounted as an Asset Pack in nanos world.
Choose unique names for the folders you create inside Content/ to avoid name collisions with other Asset Packs.
For example, if you create a folder named Content/Weapons/, and another Asset Pack also has a folder named Content/Weapons/, they will conflict with each other and will not be able to be loaded together.
In the ADK project, we already have a folder named Content/MyAssetPack/ as an example of a Game Content folder. Rename it to anything you want or create your own folders besides that.
Option B: Using Plugin Content
For Plugin Content, you must create a Plugin in Unreal Engine and create your assets inside the Plugin's Content folder. This way, you can have better organization and separation of your assets, and also you can easily share your Plugin with other people without sharing the whole Unreal Project.
The first step is to create a plugin, so open the plugin tab at Edit ⬇️ Plugins:

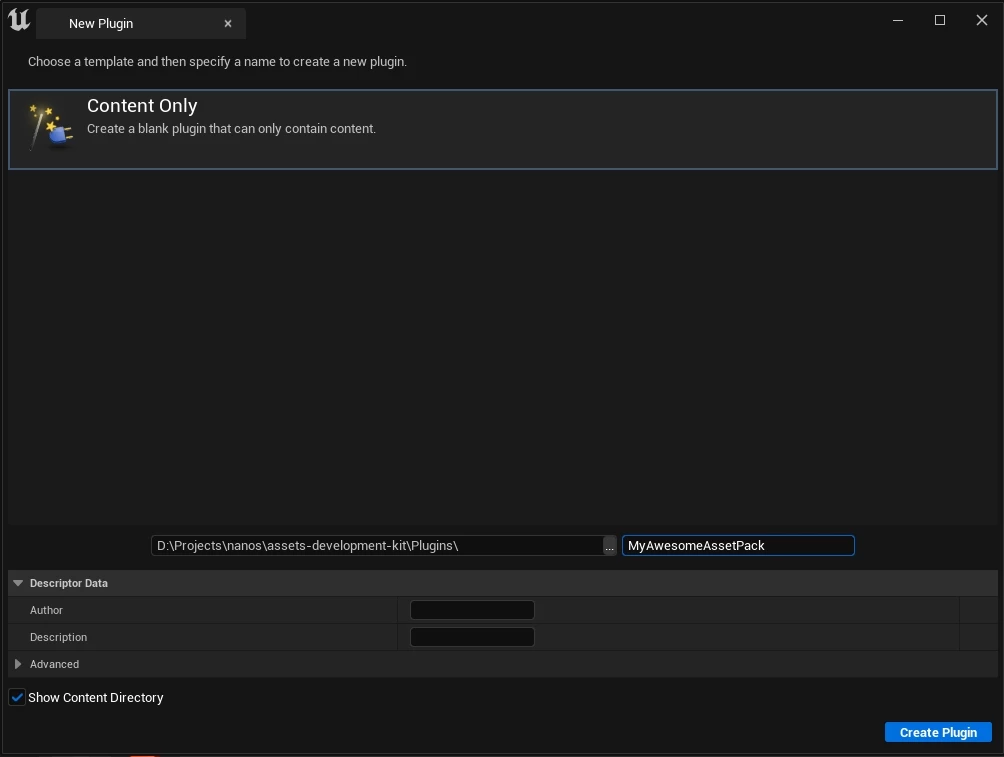
And in the upper left corner, tighten + Add:

Fill in the name of the folder to create the plugin, no other field is required:
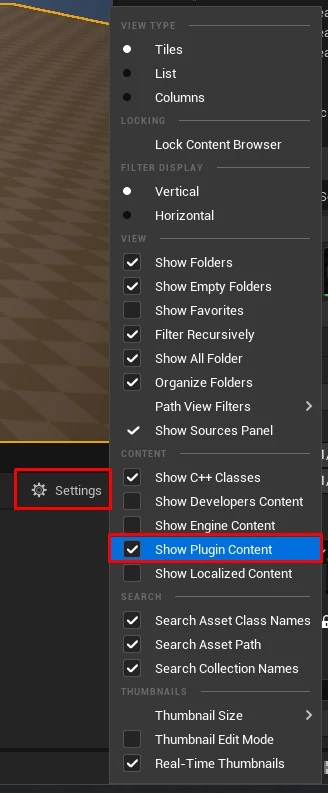
After created, enable the option to Show Plugin Content in the Content Drawer settings:
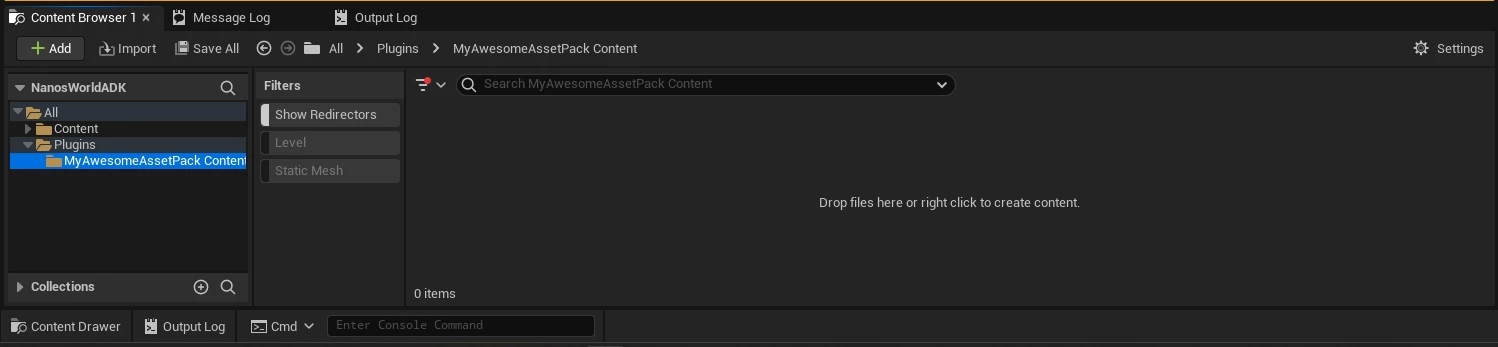
Then in the left side, you will find the plugin folder you just created, this folder will be your Asset Pack folder:
Importing external Assets
All assets you create or import must be contained inside the folders you created (the Plugin Content folder Plugins/MyAwesomeAssetPack Content/ or the Game Content folders e.g. Content/MyAssetPack/). Feel free to create sub-folders and organize the way you want.
You can drag'n drop any file from your computer inside those folders, e.g. FBX meshes or WAV sounds for example.
Look at the navigation sidebar for more specific guides and examples on how to import specific assets (Skeletal Meshes, Maps, etc). You can check them and then back here to finish the exportation:
Importing Static Meshesassets-modding/creating-assets/static-meshes Importing Character Meshesassets-modding/creating-assets/skeletal-meshes/characters-meshes Importing Vehicle Meshesassets-modding/creating-assets/skeletal-meshes/vehicles-meshes Importing Weapon Meshesassets-modding/creating-assets/skeletal-meshes/weapons-meshes Importing Mapsassets-modding/creating-assets/maps-and-levels/importing-mapsExporting & Cooking your Assets
After you imported and created your Assets, exporting them from Unreal Engine is very easy.
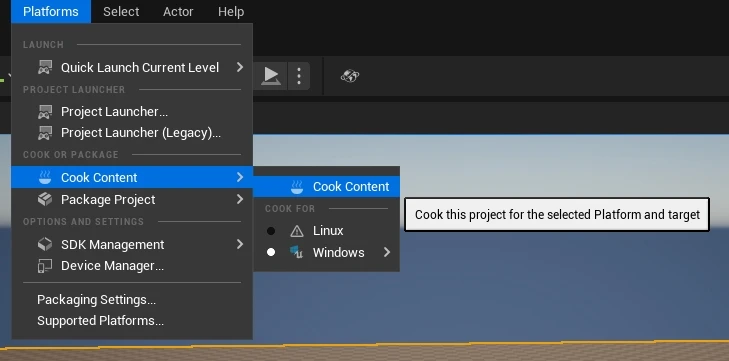
For that, select Platforms ➡ Cook Content ➡ Cook Content:
This will start the Cooking & Packaging process, which may take a while depending if the Assets were already loaded. It usually is only longer at the first time.

By default, Unreal will cook everything inside your Project. If you have too many assets, you can reduce the cooking time by selecting only the folders or maps you want to cook in the Project Settings.
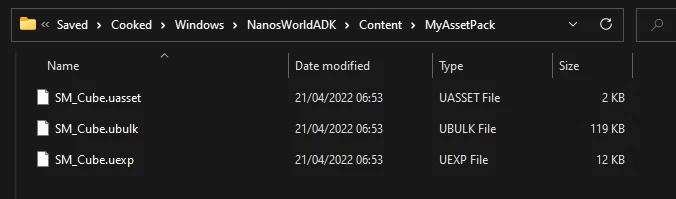
After finishing, go for the Cooked folder of your ADK project:
assets-development-kit/Saved/Cooked/Windows/NanosWorldADK/
Please don't confuse the Cooked assets folder with the Content project files. Make sure you are in the Saved/Cooked/ one!
- Using Game Content: you can find the cooked folders inside
Content/. - Using Plugin Content: you can find the cooked folders inside
Plugins/.
Inside this folder, you can find all your cooked assets. Example of a Game Content result:
After finding the Cooked folders with your assets, we can create our Asset Pack to import them into nanos world in the next section:
Creating your Asset Pack
You can create your Asset Pack manually or use the CLI to do that easy and automatically, but we recommend doing it manually the first time to understand how it works:
Create a new Asset Pack folder
The first step is to create a new folder for your Asset Pack inside your nanos-world-server/Assets/.
E.g. nanos-world-server/Assets/my-asset-pack/
Note: it must be in kebab-case, as it's a mandatory standard for nanos world Assets & Packages names.
Copy the Cooked Assets
Then copy all the Cooked folders (i.e. the ones inside Content/ or Plugins/) into your new Asset Pack folder.
For example, if you are using Game Content and you have two folders in there Content/MyAssetPack/ and Content/MyOtherAssetPack/, copy both of them into your new my-asset-pack/ folder.
If you are using Plugin Content, copy the whole Plugin folder (e.g. Plugins/MyAwesomeAssetPack/), you will notice it has a Content/ folder inside it, which is correct, so just copy the whole Plugin folder into your new my-asset-pack/ folder.
Create the Assets.toml file
Lastly, you will create the Assets.toml file in the root of your Asset Pack folder, which is the configuration file for your Asset Pack. You can copy and paste the template from Assets Pack Configuration and then fill in the correct values in the next section.
Final results
You will end up with a folder like this:
NanosWorldServer.exe
Assets/
├── my-asset-pack/
│   ├── MyAssetPack/
│   │   ├── MyAsset_01.uasset
│   │   ├── MyAsset_01.ubulk
│   │   ├── MyAsset_01.uexp
│   │   ├── MyAsset_02.uasset
│   │   ├── MyBigMap.umap
│   │   └── ...
│   ├── MyOtherAssetPack/
│   │   ├── MyOtherAsset_01.uasset
│   │   ├── MyOtherAsset_02.uasset
│   │   └── ...
│   └── Assets.toml
Config.toml
NanosWorldServer.exe
Configuring your Assets.toml
After you created your Assets.toml in the root folder of your Asset Pack. There are some important configuration to be set.
Open the Assets.toml in a text editor and configure unreal_folders, unreal_version and is_plugin_content to the correct values:
# unreal engine configurations
[unreal]
    # unreal engine folders to mount - the exact name of the root folders inside Content/ or Plugin/ used in Unreal
    unreal_folders = [
        "MyAssetPack",
        "MyOtherAssetPack"
    ]
    # unreal engine version - unreal version this asset pack was compiled on
    unreal_version =    "5.7.0"
    # whether this asset pack was created as a plugin content
    is_plugin_content = false
Another important section to configure is the [assets] one, in which you define the list of exported assets to be referenced through scripting.
For example if you export a StaticMesh SM_Cube in a sub-folder, define them like that in your Assets.toml:
# assets files
[assets]
    # ...

    # static meshes
    [assets.static_meshes]
        # Key = Path
        SM_Cube = "MyAssetPack/MySubFolder/SM_Cube"
        # ...
This way scripters can spawn your Cube Mesh like that:
Prop(Vector(0, 0, 0), Rotator(0, 0, 0), "my-asset-pack::SM_Cube")
You can use the ADK Assets.toml Generator Tool to generate your Assets.toml automatically!
Final Considerations
After cooking and copying your folder, do not rename or delete any file/folder inside your Cooked Asset Pack folder! It will break all internal references used by your assets and may cause them to appear without materials/textures or even cause crashes.
Additional Tips
Cook only what is needed
By default, Unreal will cook everything inside your Project. If you have too many assets, you can reduce the cooking time by selecting only the folders or maps you want to cook in the Project Settings.
Enable Cook only maps setting and specify the list of maps in List of maps to include in a packaged build setting, and only those maps and the assets used by them will be cooked:


Additionally, you can specify Additional Asset Directories to Cook to include other folders you want to cook:

Name your assets properly
We hardly recommend and encourage you to follow Allar's Asset Naming Conventions as a pattern for naming your assets and organizing your project folder.
We've summarized the most common names here:
| Asset Type | Prefix | Suffix |
|---|---|---|
| Skeletal Mesh | SK_ | |
| Static Mesh | SM_ | |
| Physical Asset | PHYS_ | |
| Material | M_ | |
| Material Instance | MI_ | |
| Animation | A_ | |
| Animation Montage | A_ | |
| Particle | P_ | |
| Sound Wave | A_ | |
| Sound Cue | A_ | _Cue |
| Texture | T_ | _? (see Textures) |
Reduce the size of your Assets
Use small assets size and configure textures compression properly (big files are bad for network bandwidth). We recommend max 2048x2048 size for textures, as they will be 5MB each.
Creating Assets Thumbnails
It is a good practice to include thumbnails of your assets into a folder called Thumbnails/ in the root of your Asset Pack. This is a convention as the Sandbox game-mode reads from it to display on Spawn Menu. Add .jpg with the name of the assets all in the Thumbnails folder.
You can use the ADK Thumbnail Generator Tool to generate them!
Using Engine Content
Avoid using Engine Content (i.e. Engine's Materials or Meshes). If you want to use them, we recommend copying them to your Content/YourAssetPack/ folder, otherwise they may not be exported correctly.
There are some Engine Content which are allowed to use, but only from the following folders (these are already included by the base game and are safe to use):
/Engine/Functions/Engine/BasicShapes/Engine/ArtTools/Engine/EngineMaterials
Troubleshooting
Common Fixes
Most of the problems can be easily fixed by trying the following steps:
1. Make sure you are not copying Project Assets instead of Cooked Assets
Unreal Project files are not meant to work in runtime, they must be compiled/cooked to load in-game. The cooked assets usually have the extensions:
.uasset,.uexportand.ubulk. See more here.
2. Make sure your ADK is updated
Cooking your assets with old ADK can cause incompatibilities between the Game and your Assets.
3. Delete Saved/, Intermediate/ and DerivedDataCache/ from your Project folder
Sometimes it's good to try a full recook, as the Cooked assets can get corrupted by old Unreal versions.
4. Copy all used cooked assets folder into your Asset Pack
If you are trying to load a map and specified that in the Project Settings to cook only that map, probably it generated one or more folders inside your
Saved/Cooked/folder. This means that ALL these folders and files are needed to make the map to load. So you MUST copy each folder in there (of course you shouldn't create an Asset Pack for the NanosWorld/ folder).
5. If you use Git, make sure LFS was enabled
If you use Git (with LFS) to upload your cooked assets and clone them in a VPS (not a great solution), make sure you also enabled LFS in the VPS machine, so it clones the LFS assets locally correctly.
6. Verify your Unreal Engine Installation
It is possible you accidentally modified an Engine asset, which can cause incompatibilities with the game's cooked assets because the project will expect a different version. Verify your Unreal Engine installation in the Epic Games Launcher to ensure it is valid, then try cooking again.
Common Problems
Common problems when importing assets and possible solutions:
Assets without Materials/Textures
If you loaded the assets in-game and they don't have material (they are gray). It can be two problems: you didn't set
unreal_foldersin your Assets.toml correctly, or you modified/moved/copied the files wrongly from the Cooked folder.
Corrupt data found, please verify your installation
If you see this error as a Popup, please make sure to retry all steps listed here or try cleaning up your local
NanosWorld/Server/Assets/folder and re-downloading the files from the server.
Game Crash during/after loading a custom map or custom assets
This usually happen because of corrupted or bad created assets, please make sure to retry all steps listed here.
Disconnected. Failed to Load Map! Canceled or Failed!
This error usually happens when the game couldn't find your map to load. This can be because of badly configured Assets.toml
unreal_folderssetting or because you copied Unreal Project files instead of Cooked files into your Asset Pack.